> ## Documentation Index
> Fetch the complete documentation index at: https://gnosispay-feat-v2-auth-module.mintlify.site/llms.txt
> Use this file to discover all available pages before exploring further.
# Partner Secure Elements (PSE) Integration
> Display sensitive card information and manage PINs securely in your client application using PSE SDK (PSE version 3 with EIP-712 two-factor authentication).
## Overview
If you want to display sensitive information (such as card numbers or PINs) in your front-end, you'll need to interact with our **Partner Secure Elements (PSE)** service. The easiest way to do this is by using the [PSE SDK](https://www.npmjs.com/package/@gnosispay/pse-sdk) from Gnosis Pay.
To initialize the SDK, you'll need:
* An `App ID` provided to you upon registration with Gnosis Pay
* An **ephemeral-token** retrieved from the PSE private API using mTLS authentication
* An **auth module token** obtained through the [SIWE authentication flow](/v2/v2-siwe-auth)
* An **EIP-712 signature** and **nonce** obtained from the challenge flow described below
**PSE version 3** adds an EIP-712 wallet signature as a second factor for every sensitive operation. Pass `pseVersion: 3` when constructing the SDK and include `eip712Signature` and `eip712Nonce` obtained from the challenge flow described below.
Note: `pseVersion` refers to the PSE SDK protocol version and is unrelated to the Gnosis Pay API path (which remains `/v2`).
**Backend Required**: mTLS authentication can only be performed from a
back-end. You need a back-end responsible for retrieving the
ephemeral-token and sending it to your front-end upon request. We'll go
through each step in this guide.
Once your front-end has the ephemeral-token and auth module token, it can initialize the PSE SDK and use it to display secure elements.
Here's a diagram showing each step:
```mermaid theme={null}
sequenceDiagram
participant FE as Your Frontend
participant BE as Your Backend
participant Auth as Auth Module
participant PSE as PSE API
FE->>Auth: SIWE Login
Auth-->>FE: authModuleToken (15min access token)
FE->>BE: Request ephemeral-token
BE->>PSE: POST /api/v1/ephemeral-token (mTLS)
PSE-->>BE: ephemeral-token
BE-->>FE: ephemeral-token
FE->>Auth: GET /pci/cards/{cardId}/challenge?action=...
Auth-->>FE: EIP-712 typed data (domain, types, message, nonce)
Note over FE: User signs typed data in wallet
Note over FE: Initialize PSE SDK (PSE version 3) with
ephemeralToken, authModuleToken, appId,
eip712Signature, eip712Nonce
FE->>PSE: SDK requests card data
PSE->>Auth: Verifies EIP-712 signature + nonce
Auth-->>PSE: Signature valid
PSE-->>FE: Renders card data in secure iframe
```
***
## Secure Connection Using mTLS Authentication
**Mutual TLS (mTLS)** is a type of authentication in which two parties in a connection authenticate each other using the TLS protocol. Your back-end will establish an mTLS authentication with the Gnosis Pay private PSE API to receive an ephemeral-token.
### How to Generate mTLS Certificates
After signing up through the [Partners Dashboard](https://partners.gnosispay.com/), you will receive an `App ID` instantly, which will be used in the certificate generation below. You must first create a private key and then generate a Certificate Signing Request (CSR) using the `App ID` as follows:
```graphql theme={null}
# APP_ID is a string starting with `gp_` that you have received from Gnosis Pay
export APP_ID="gp_woop_123"
# Create a private key (NEVER share with anyone)
openssl ecparam -name prime256v1 -genkey -noout -out "${APP_ID}.key.pem"
# Create the CSR (OK to share)
openssl req -new -sha256 -key "${APP_ID}.key.pem" -out "${APP_ID}.csr.pem" -subj "/CN=${APP_ID}"
```
You can now share the `${APP_ID}.csr.pem` file with the Gnosis Pay team. **DO NOT EVER** share the `.key.pem` file with **ANYONE**.
Once we receive your Certificate Signing Request, we will sign it and send you back the signed certificates. These signed certificates, along with your private key, are used to establish the connection with the PSE API.
### How to Establish an mTLS Authentication (in Node.js)
You should securely store the certificates in your environment along with your private key.
Your environment should expose the certificates and private key, for example:
```rust theme={null}
SIGNED_CERTIFICATES="-----BEGIN CERTIFICATE-----
ABCQz ....
-----END CERTIFICATE-----
-----BEGIN CERTIFICATE-----
DEFC7 ....
-----END CERTIFICATE-----
-----BEGIN CERTIFICATE-----
GHICc ....
-----END CERTIFICATE-----"
PRIVATE_KEY="-----BEGIN EC PRIVATE KEY-----
ABCD....
-----END EC PRIVATE KEY-----"
```
Here's a Node.js implementation to request the ephemeral-token in two different ways:
```js Using Axios theme={null}
const httpsAgent = new https.Agent({
cert: process.env.SIGNED_CERTIFICATES,
key: process.env.PRIVATE_KEY,
rejectUnauthorized: true, // Ensure SSL verification
});
const ephemeralTokenRequest = await axios({
httpsAgent: httpsAgent,
method: "POST",
url: `https://api-pse.gnosispay.com/api/v1/ephemeral-token`,
headers: { "Content-Type": "application/json" },
// Axios adds the user-agent automatically
});
```
```js Using https.request theme={null}
import https from "https";
const httpsAgent = new https.Agent({
cert: CERT,
key: KEY,
rejectUnauthorized: true,
});
const req = https.request(
{
hostname: "api-pse.gnosispay.com",
path: "/api/v1/ephemeral-token",
method: "POST",
headers: {
"Content-Type": "application/json",
"User-Agent": "User-Client/1.0.0",
},
agent: httpsAgent,
},
(res) => {
let data = "";
res.on("data", (chunk) => {
data += chunk;
});
res.on("end", () => {
console.log("Status:", res.statusCode);
try {
const parsedData = JSON.parse(data);
console.log("Response:", parsedData);
} catch {
console.log("Raw response:", data);
}
});
}
);
req.on("error", (error) => {
console.error("Request error:", error);
});
req.end();
```
The ephemeral-token, as its name suggests, is valid for a very short time
frame. It is advised to generate a new one for every usage of the SDK.
***
## EIP-712 Two-Factor Authentication
PSE version 3 requires a wallet signature before each sensitive operation. This acts as a second factor: even if an `authModuleToken` is compromised, an attacker cannot view card data or change a PIN without also controlling the user's wallet.
### How It Works
Before initializing the SDK, your front-end must:
1. Request a one-time **challenge** from the auth module.
2. Ask the user's wallet to **sign** the returned EIP-712 typed data.
3. Pass the resulting **signature** and **nonce** to the SDK constructor.
The PSE service forwards both values to the auth module, which verifies the signature and marks the nonce as consumed. Each challenge is **single-use** and **expires after 5 minutes**.
### The Challenge Endpoint
```
GET /pci/cards/{cardId}/challenge?action={action}
Authorization: Bearer {authModuleToken}
```
The `action` parameter determines which operation is being authorized:
| `action` | Operation |
| -------------- | ---------------------------------------------- |
| `view-details` | Display card number, expiry, and security code |
| `view-pin` | Display the current PIN |
| `change-pin` | Set or change the PIN |
The response is a complete EIP-712 typed data object, ready to pass directly to `signTypedData`:
```json theme={null}
{
"domain": {
"name": "Display VISA Card Details",
"version": "1",
"chainId": 42220
},
"primaryType": "Message",
"types": {
"Message": [
{ "name": "authorization", "type": "string" },
{ "name": "nonce", "type": "uint256" }
]
},
"message": {
"authorization": "Display VISA Card Details",
"nonce": "123456789012345678901234567890"
}
}
```
`message.nonce` is returned as a decimal string representing a `uint256`.
Convert it to `BigInt` before passing it to `signTypedData`.
### Signing the Challenge
```typescript Using wagmi theme={null}
import { useSignTypedData } from "wagmi";
const { signTypedDataAsync } = useSignTypedData();
// 1. Fetch the challenge (authModuleToken is sent automatically via client config)
const { data, error } = await getPciCardsByCardIdChallenge({
path: { cardId },
query: { action: "view-details" },
});
if (error || !data) throw new Error("Failed to get EIP-712 challenge");
// 2. Sign — convert nonce to BigInt for the uint256 type
const signature = await signTypedDataAsync({
domain: data.domain,
types: data.types,
primaryType: data.primaryType,
message: {
authorization: data.message.authorization,
nonce: BigInt(data.message.nonce),
},
});
// 3. Pass to SDK constructor
const eip712Signature = signature;
const eip712Nonce = data.message.nonce; // keep as decimal string
```
```typescript Using viem directly theme={null}
import { createWalletClient, custom } from "viem";
import { celo } from "viem/chains";
const walletClient = createWalletClient({
chain: celo,
transport: custom(window.ethereum),
});
// 1. Fetch the challenge
const response = await fetch(
`/pci/cards/${cardId}/challenge?action=view-details`,
{ headers: { Authorization: `Bearer ${authModuleToken}` } }
);
const data = await response.json();
// 2. Sign
const [account] = await walletClient.getAddresses();
const signature = await walletClient.signTypedData({
account,
domain: data.domain,
types: data.types,
primaryType: data.primaryType,
message: {
authorization: data.message.authorization,
nonce: BigInt(data.message.nonce),
},
});
const eip712Signature = signature;
const eip712Nonce = data.message.nonce;
```
The challenge must be fetched **immediately before** each SDK initialization.
Do not reuse a nonce across different operations or SDK instances — it will be
rejected after the first use.
***
## How to Use the PSE SDK
### Installation
```bash theme={null}
npm install @gnosispay/pse-sdk
```
### Backend: Ephemeral Token Relay
Your backend needs an endpoint that proxies ephemeral token requests to the PSE private API using mTLS. Here's an example using Express:
```js theme={null}
import express from "express";
import axios from "axios";
import https from "node:https";
const app = express();
app.get("/api/ephemeral-token", async (_req, res) => {
try {
const cert = Buffer.from(process.env.CLIENT_CERT, "base64").toString("ascii");
const key = Buffer.from(process.env.CLIENT_KEY, "base64").toString("ascii");
const httpsAgent = new https.Agent({ cert, key, rejectUnauthorized: true });
const response = await axios({
method: "POST",
url: "https://api-pse.gnosispay.com/api/v1/ephemeral-token",
headers: { "Content-Type": "application/json" },
httpsAgent,
});
res.json({ data: response.data.data });
} catch (error) {
res.status(502).json({ error: "Failed to reach PSE private API" });
}
});
```
In this example, `CLIENT_CERT` and `CLIENT_KEY` are the base64-encoded signed certificate and private key stored in your environment variables.
### Frontend: Initialize the SDK
After completing the EIP-712 challenge/sign step above, initialize the SDK with `pseVersion: 3`:
```typescript theme={null}
import GPSDK, { ElementType } from "@gnosispay/pse-sdk";
// 1. Get the auth module access token from your SIWE auth flow
const authModuleToken = getAccessToken(); // your auth implementation
// 2. Fetch ephemeral token from your backend
const response = await fetch("/api/ephemeral-token");
const { data } = await response.json();
// 3. Fetch and sign an EIP-712 challenge (see section above)
// Use the action matching the operation you are about to perform:
// "view-details" | "view-pin" | "change-pin"
const { eip712Signature, eip712Nonce } = await getSignedChallenge(cardId, "view-details");
// 4. Initialize the SDK with PSE version 3
const gpSdk = new GPSDK({
pseVersion: 3, // PSE version 3 — required for EIP-712 2FA
appId: "gp_your_app_id", // Your Partner App ID
ephemeralToken: data.ephemeralToken,
authModuleToken: authModuleToken, // Auth module access token
eip712Signature: eip712Signature, // Hex signature from wallet
eip712Nonce: eip712Nonce, // Decimal nonce string from challenge
onActionSuccess: (action) => {
console.log("Action completed:", action);
},
onInvalidToken: (message) => {
console.error("Token invalid:", message);
// Refresh the ephemeral token and reinitialize
},
onError: (message, details) => {
console.error("PSE error:", message, details);
},
});
```
The `authModuleToken` expires every 15 minutes. Handle the `onInvalidToken`
callback to refresh your access token via the [token refresh flow](/v2/v2-siwe-auth)
and re-initialize the SDK.
### Display Card Details
Use `ElementType.CardData` to display the full card number, expiration date, and security code.
Use `action: "view-details"` when fetching the EIP-712 challenge for this element.
```typescript theme={null}
// cardId is a UUID obtained from GET /cards
const { destroy } = gpSdk.init(ElementType.CardData, "#card-data-container", {
cardId: "019c9578-a8ce-7445-9961-51b945605f70",
});
// Call destroy() when unmounting or cleaning up
destroy();
```
### View Card PIN
Use `ElementType.CardPin` to display the card's current PIN inside the secure iframe.
Use `action: "view-pin"` when fetching the EIP-712 challenge for this element.
```typescript theme={null}
// Fetch and sign the challenge with action "view-pin" before constructing the SDK
const { eip712Signature, eip712Nonce } = await getSignedChallenge(cardId, "view-pin");
const gpSdk = new GPSDK({
pseVersion: 3,
appId: "gp_your_app_id",
ephemeralToken: data.ephemeralToken,
authModuleToken: authModuleToken,
eip712Signature,
eip712Nonce,
onActionSuccess: (action) => { /* ... */ },
onInvalidToken: (message) => { /* ... */ },
onError: (message, details) => { /* ... */ },
});
const { destroy } = gpSdk.init(ElementType.CardPin, "#pin-container", {
cardId: "019c9578-a8ce-7445-9961-51b945605f70",
});
```
### Set / Change Card PIN
Use `ElementType.SetCardPin` to render a PIN entry form that lets the cardholder set or change their PIN.
Use `action: "change-pin"` when fetching the EIP-712 challenge for this element.
```typescript theme={null}
// Fetch and sign the challenge with action "change-pin" before constructing the SDK
const { eip712Signature, eip712Nonce } = await getSignedChallenge(cardId, "change-pin");
const gpSdk = new GPSDK({
pseVersion: 3,
appId: "gp_your_app_id",
ephemeralToken: data.ephemeralToken,
authModuleToken: authModuleToken,
eip712Signature,
eip712Nonce,
onActionSuccess: (action) => {
// Fired with Action.SetPin when the user submits the new PIN,
// and Action.DoneSettingPin when the operation is confirmed.
console.log("PIN operation completed:", action);
},
onInvalidToken: (message) => { /* ... */ },
onError: (message, details) => { /* ... */ },
});
const { destroy } = gpSdk.init(ElementType.SetCardPin, "#set-pin-container", {
cardId: "019c9578-a8ce-7445-9961-51b945605f70",
});
```
### Refresh Ephemeral Token
If you need to refresh the ephemeral token without re-creating the SDK instance:
```typescript theme={null}
const newToken = await fetchNewEphemeralToken();
gpSdk.refreshToken(newToken);
```
### Callbacks
The SDK provides three callbacks to handle events from the iframe:
| Callback | Trigger |
| --------------------------- | ------------------------------------------------------------------------------ |
| `onActionSuccess(action)` | A user action completes (e.g., `CardNumberCopied`, `SetPin`, `DoneSettingPin`) |
| `onInvalidToken(message)` | The ephemeral token has expired or is invalid |
| `onError(message, details)` | An error occurred inside the iframe |
***
## How to Customize the Style of Secure Elements in the iframe
For security reasons, the only way to apply custom styling to iframe elements is to prepare and share a **CSS file** with the Gnosis Pay team. This file, named `.css`, will be incorporated into the iframe.
Standard styling is applied to the iframe elements by default. You can override the style of these classes and IDs as needed. Here are some of them:
#### Card Data
* `.pse-container` - A shared class for all iframe containers.
* `#pse-card-data-container` - The main container for displaying card data.
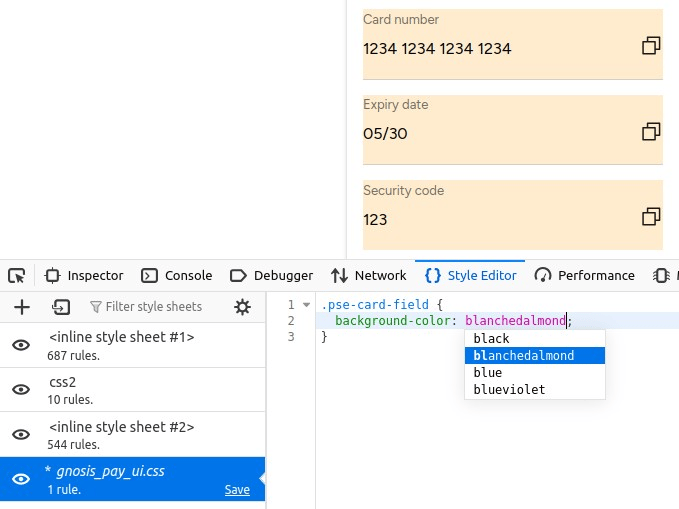
* `.pse-card-field` - The container for each card data field (card number, expiry date, security code).
* `.pse-card-label` - Labels for each field.
* `.pse-card-value` - The container for the actual card data values.
***
### Styling Guide
Here is a suggested workflow to customize the styling:
1. In your front-end, load the element you wish to customize (e.g., the card data).
2. Locate the custom CSS file with your name in either the "**Style Editor**" in Firefox or the "**Sources**" panel on Chrome/Brave. In the example below, the file is `gnosis_pay_ui.css`.
3. Apply your desired styling. The changes will be reflected in your interface immediately.
4. Save the file and send it to Gnosis Pay for application in production.
Here is an example of overriding the `.pse-card-field` class in Firefox: